| |
![]()
 Materials
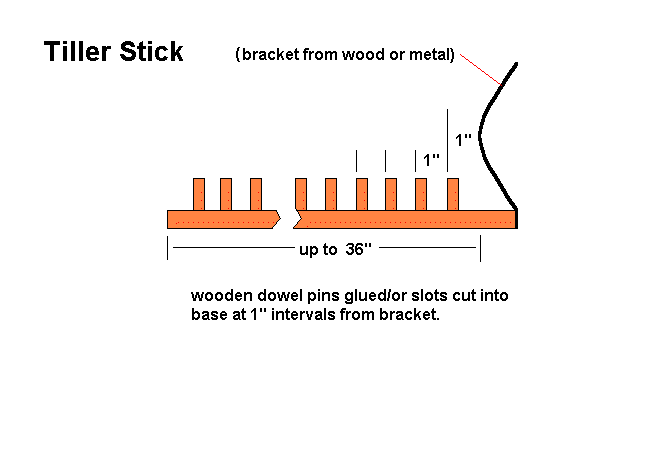
The stick is made longer than you intend to draw the bow, up to 36" long is good, with
slots cut into one side at every inch mark. The edges of these slots should be rounded so
as to not wear the bowstring. The center of the bow rests in the hollow at the top of the
tiller stick and the string is drawn down. This can be used to both show the current draw
weight and also the current draw length. If the base of the stick is placed on a set of
kitchen scales and the string drawn down level to the slots, the downward pressure on
the stick shows as the draw weight on the scales. (The string must be held just clear of
the stick to check the draw weight). Also, the string can be slid into any of the slots to
hold the bow in a curved state while you stand back and look at it to check the
developing curve. It is also useful to trace the shape of the arc on the wall/floor for
various draw lengths to check shape/flexing. This is a sensible precaution to set up if
you plan on making several different bows.
Once the first (long) bowstring is fitted, the bow is placed in the tiller stick and the
string drawn till the bow has a small constant curve. From the first time the bow is bent,
the curve must be gradually built up from a small gradual curve to the final state, flexing
it slightly further at each stage. And once it starts bending, it should not be drawn to a
greater weight than the intended final weight of the bow. (In fact, it should be worked to
a couple of pounds higher than intended as it is likely to loose a couple of pounds in the
final finishing). Once the nocks of the bow are flexing about 12-14" forward from
straight, the normal length bowstring can be fitted and used from then on for testing. The
belly of the bow should show the growth rings meeting in the middle of the bow as the
curve develops, and these should be running steadily out to
the tips as the constant taper develops.
As the bow is placed in the tillering stick and drawn slightly, step back and look at both
limbs. If they are not both curving equally, mark the places that are not bending enough,
take the bow off the stick and work it down further. If there are areas that are bending too
much, then don't touch these areas until those on either side are worked down so as to
spread the curve more evenly. Both limbs must develop the same curve, and that curve
should be fairly constant and even from grip to nocks. At every stage, and every time the
bow is tested, check the curves of the limbs. Check the curve, get them even, then check
the draw weight of the bow. Then draw the bow to the current distance several times
(10-15), to exercise the wood. This allows the wood to slowly weaken and get used to
bending. Once the curves are even, take the string down another notch in the tillering
stick and repeat the procedure until the desired draw length is reached.
The final weight of the bow should be about 2-4 lb. higher than the desired weight. Final
finishing (sanding etc.) plus initial shooting of the bow will cause it to drop the final 2-4
pounds so as to achieve the desired weight. When the bow is completed, it is usually
preferable to glue a thin block of wood along the back of the handgrip, shaped to fit the
hand better. Once the bow is sanded, it can be sealed with a decent polyurethane or
similar to waterproof, seal and protect it. Alternatively use a polymerising gun stock oil
such as Birchwood Casey Tru-Oil. Then fit nocks and handgrips as required. If desired,
a backing strip can also be added before the handgrip block is glued in place. The
backing strip is likely to raise the draw-weight by a small amount (2-5 pounds). Once
the bow has reached it's desired draw weight, it should never be drawn to any greater
draw length. To do so, greatly risks snapping the bow. So don't lend it to another archer
without carefully supervising them.
Offered by Brian.
